
This article originally appeared in Fine Homebuilding Magazine, issue 220, June/July 2011, however its message stays as pertinent as ever. While energy codes and screening procedures have actually progressed over the past years, the principles of duct leak– how it affects convenience, safety, and energy efficiency– have actually not altered. What follows is a practical look at why duct sealing matters and how to detect and fix common issues.
Why we test ducts
Unlike pipelines, ducts do not hold water, sewage, or flammable gases, so many people do not stress over them dripping. Leaking ducts can trigger a host of building problems, nevertheless, varying from cold spaces to a life-threatening buildup of carbon monoxide.
Since heating and cooling systems use a blower to distribute conditioned air, duct leak can negatively affect air pressure inside a home and magnify air infiltration and exfiltration through the building envelope.
At a minimum, dripping ducts mean the air in your a/c system isn’t going where it’s supposed to, making it more expensive to run the system and harder to keep your home comfy.
Luckily, building codes are finally recognizing that leaking ducts are a problem. The 2006 International Residential Code (IRC) requires (in section M1601.3.1) that “joints of duct systems shall be made considerably airtight by means of tapes, mastics, gasketing, or other authorized closure systems.” A 2009 IRC arrangement requires any home with ducts outside the thermal envelope to have them checked for airtightness and to fulfill specific requirements.
Unfortunately, couple of a/cs installers focus on duct-sealing, and even fewer are familiar with brand-new code requirements. If you’re a concerned property owner, builder, or remodeler, you’ll likely have to shepherd testing and sealing efforts yourself.
Duct-testing basics
It’s a given that all ducts leak at least a little, however the majority of duct systems leak a lot more than is appropriate.
You can test duct tightness in numerous methods. We regularly use two approaches: a pressure pan and a duct blower with a blower door. A pressure pan is bit more than a gasketed cover to location over supply and return registers. A tap on the top of the pan is connected to a hose that runs to a pressure gauge.
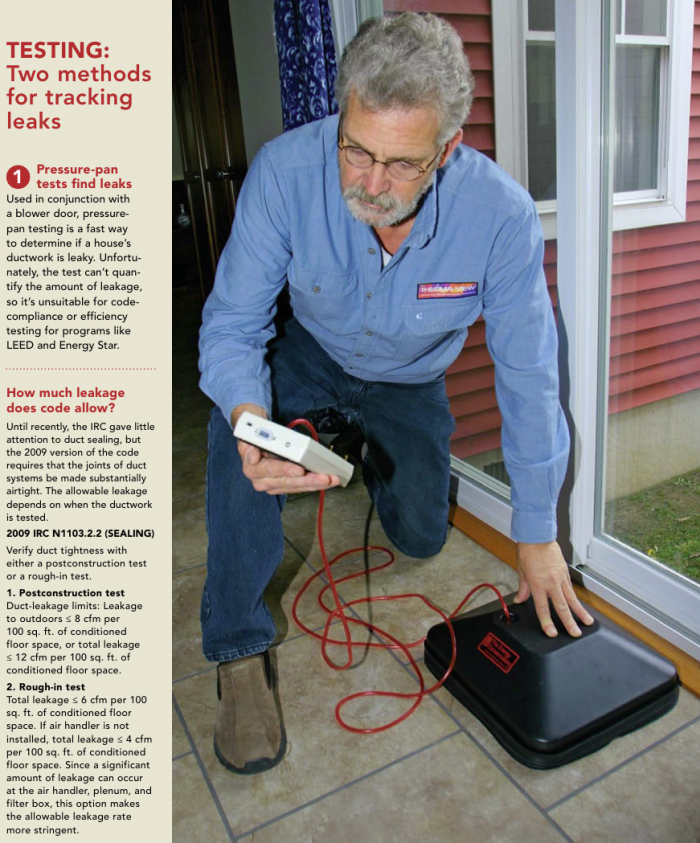
Here’s how to conduct the test: With a blower door depressurizing your home to 25 pascals and with all the supply and return registers open, connect the pressure pan to a manometer(air-pressure gauge), and hold the pan tightly over a register. The negative pressure created by the blower door draws air through all the leaks in the ductwork and after that appears as a reading from 1 to 25 pascals on the pressure gauge. Greater numbers indicate leakier ducts.
Of the 2 preferred methods, this test is quicker and simpler to do. Pressure-pan screening is most beneficial where ducts are outside the thermal envelope: in crawlspaces, unconditioned basements, vented attics, and leaking flooring cavities. If ducts are inside a conditioned basement, we open a basement door or window, which essentially puts the ductwork outside the thermal envelope.
Pressure-pan testing informs us where duct leak is happening and which duct runs are the leakiest, but it does not identify the specific quantity of air leak. To quantify this leak as laid out in the 2009 IRC and other building standards, we use a blower door with a duct blower.
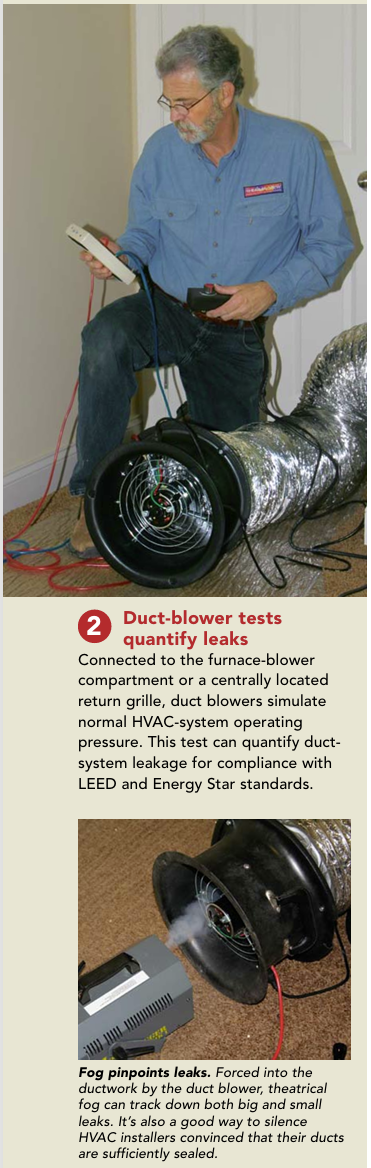
A duct blower is a variable-speed fan that simulates regular duct pressure (25 pascals) when the HVAC system is running. A pressure and circulation gauge determines the amount of air going into the system and the quantity leaking out. To do this test, duct blowers can be set up at the furnace-blower compartment or in the main return inside the home. Unfortunately, a duct-blower test by itself does not tell whether the ducts are dripping inside or outside the conditioned area, so we typically use the duct blower in conjunction with a blower door.
We pressurize your home to 25 pascals with a blower door, tape off all supply and return registers, and then adjust the duct-blower fan speed until the duct and home pressures are the very same. We place a probe from the pressure gauge into the supply ductwork to measure airflow. Any circulation (measured in cfm) appearing on this gauge is air dripping to the exterior.
Often we use a theatrical fog maker in combination with the duct blower to find the greatest duct leaks. The fog is a terrific method to see where to focus our sealing efforts. It can be hard to find business doing duct testing, however some home-performance contractors, energy auditors, and forward-thinking heating and cooling companies perform duct tightness tests, especially in locations with rigorous code enforcement.
Where do ducts leakage?
Ducts leak at almost every seam and shift. Of course, it’s much easier to seal leakages in new building and construction before the walls are closed, so you need to strive to see that this work is performed before you insulate the structure.
In older homes, you have to seal where you can. Unless there are huge problems, it most likely does not make economic sense to open walls and ceilings for duct-sealing alone unless a deep-energy retrofit is planned. For existing homes, the best return on investment comes from sealing exposed ductwork in the attic and basement (or crawlspace).
Start with the huge holes
The very first concern must be to repair damaged connections (typically called disconnects). Disconnects can waste substantial amounts of energy and make balancing air shipment to spaces almost impossible. Typical issues include missing out on end caps and filter slot covers, and apart floor and ceiling registers.
Next on the list is sealing leaks nearest to the air handler or heating system blower, consisting of supply and return plenums, plenum adapters, and filter slots. These connections are under the greatest pressure, making leakages more substantial than in other parts of the system. Essential, return-duct leaks anywhere combustion appliances lie can be harmful. These leaks can contribute to an accumulation of carbon monoxide when the resulting unfavorable atmospheric pressure in the combustion location prevents flue gases from going up the chimney and rather brings the flue gases (consisting of carbon monoxide) back into the house. This situation, called back drafting, can be lethal.
Next in line of importance is sealing accessible connections between the duct sections, branches, and places where departures connect to primary trunk lines. It’s also a good concept to seal any visible connections at register boots.
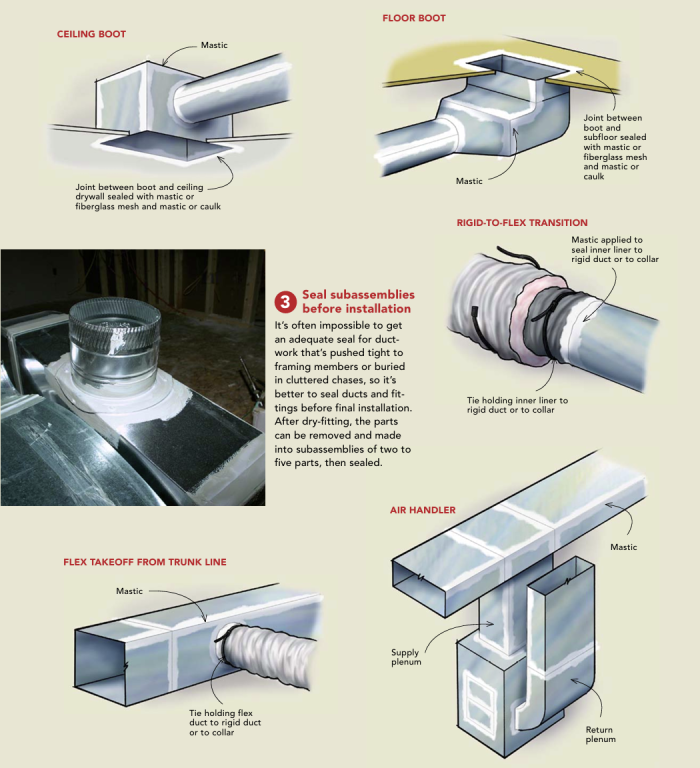
Screws, then mastic
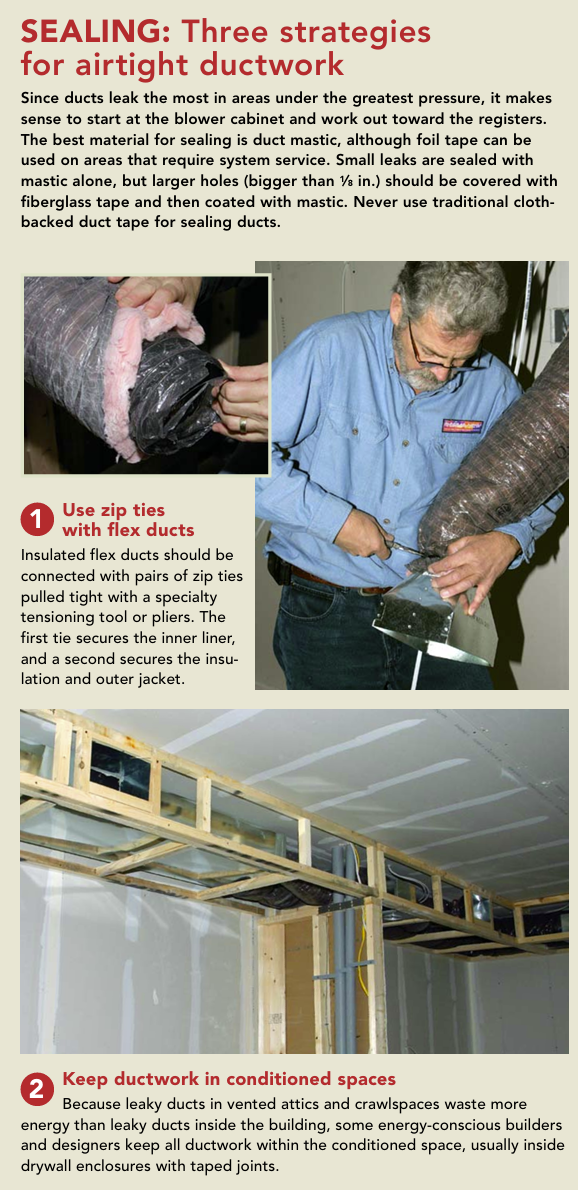
The first step in sealing ducts is to make certain the parts are mechanically fastened to each other. Rectangular metal duct must be accompanied manufacturer-specified adapters. Round ducts with crimped joints ought to have 3 screws evenly spaced around the circumference. Insulated versatile duct ought to use sets of appropriately sized zip ties: one to protect the inner liner and a 2nd around the insulation and external coat.
As soon as the connections are secured, spaces and joints need to be covered with a thick layer of mastic. Any spaces bigger than 1⁄8 in. large very first ought to be strengthened with fiberglass tape. Mastic can be gray, cream, or white to mix in with common HVAC-equipment colors. We like RCD items (www.rcdmastics.com). Using duct mastic is easy. In some cases it’s painted on with a brush. More often, though, we wear latex gloves and put it on with our hands because it’s easier to get the mastic on top of the ducts, particularly when they’re close to the ceiling or subfloor.
Some installers prefer duct tape because it’s less messy. Aluminum tape is great for fiber glass duct board and benefits air-handler cabinets because it’s simple to get rid of for system repair work. Butyl-backed aluminum tape is likewise becoming more popular. However, we find that the ducts need to be spotless for the tape to stick permanently. Routine cloth backed duct tape is never ever the best product for sealing ducts.
A. Tamasin Sterner is president and chief coach of Pure Energy Coach in Lancaster, Pa. Larry Armanda was the owner of Therma-View Infrared and Energy Professionals in South Williamsport, Pa. Larry passed away a few years ago. Photos by Patrick McCombe. Illustrations by Chuck Lockhart.
Weekly Newsletter
Get structure science and energy efficiency suggestions, plus special offers, in your inbox.